

Identifying the signs indicating repair won't suffice is crucial before embarking on a bath room mixer replacement project. Here's why investing in quality replacement parts is essential for ensuring durability and longevity:
Persistent Leakage: If your bathtub faucet continues to leak despite multiple repair attempts, it may indicate underlying issues that require more than just a quick fix. Leaks can lead to water damage, mold growth, and increased water bills if left unresolved.
Visible Damage: Visible signs of damage such as rust, corrosion, or cracks in the faucet body or handles indicate structural deterioration that cannot be easily repaired. These issues compromise the functionality and aesthetics of the faucet, necessitating replacement.
Reduced Water Flow: A bath room mixer with reduced water flow may be due to mineral buildup or internal damage that cannot be effectively repaired. Replacing the faucet with a new one ensures optimal water flow and prevents further plumbing issues.
Outdated Design: If your bathtub faucet has an outdated design that no longer suits your aesthetic preferences or decor style, replacing it with a modern and stylish faucet can enhance the overall look of your bathroom.
Investing in quality replacement parts, such as durable stems, handles, and spouts, ensures that your new bathtub faucet will withstand daily use and maintain its functionality for years to come. Quality parts are less prone to wear and tear, corrosion, and leaks, providing peace of mind and avoiding the need for frequent repairs or replacements. By prioritizing quality when selecting replacement parts, you can ensure that your bathtub faucet replacement project is a worthwhile investment in the long-term comfort and value of your home.
Identifying Faucet
Identifying slip-on and screw-on spouts for your faucet involves examining the installation method and the presence of specific features.
Slip-On Spouts:
Attachment Method:
Slip-on spouts slide directly onto the copper pipe or stub-out nipple extending from the wall.
Set Screw:
Look for a set screw underneath the spout, which is used to secure it in place once slid onto the pipe.
Smooth Exterior:
Slip-on spouts typically have a smooth exterior without visible threads on the inside.
Screw-On Spouts:
Threaded Connection: Screw-on spouts feature internal threads that match the threads on the threaded pipe or nipple protruding from the wall.
Threads Visible: You may observe visible threads on the inside of the spout, indicating that it screws onto the pipe for attachment.
Stability: Screw-on spouts often offer greater stability once installed due to the threaded connection, minimizing movement or wobbling.
By inspecting these characteristics, you can determine whether your faucet has a slip-on or screw-on spout. Understanding the type of spout will help you choose the appropriate replacement parts and plan the installation process accordingly.
Removing a bathtub faucet is a crucial step in the process of installing new bath taps.
Turn Off the Water Supply:
Locate the main water shut-off valve for your bathroom and turn it off to stop the flow of water to the bathtub.
Prepare the Workspace:
Clear the area around the bathtub and lay down a towel or drop cloth to protect the surface from scratches or damage.
Remove the Handles:
Use a screwdriver to remove any decorative caps or covers on the handles.Unscrew the handle screws located underneath the caps and carefully remove the handles.
Loosen the Trim Plate or Escutcheon:
If your faucet has a trim plate or escutcheon covering the area around the faucet, use a screwdriver to loosen and remove it.
Loosen the Locknut or Mounting Nut:
Use an adjustable wrench to loosen the locknut or mounting nut that secures the faucet to the bathtub.Turn the wrench counterclockwise to loosen the nut, and continue until it is completely detached.
Detach the Faucet Assembly:
Once the locknut or mounting nut is removed, carefully pull the old faucet assembly away from the bathtub wall.If the faucet is stuck or difficult to remove, you may need to use a wrench or pliers to gently wiggle it free.
Inspect the Area:
After removing a bathtub faucet, inspect the area around the bathtub for any signs of damage, corrosion, or leaks.Clean the surface to remove any debris or residue left behind by the old faucet.
Seal the Water Supply Pipes:
To prevent water from leaking out of the exposed pipes, consider using plumber's tape or a cap to seal off the ends temporarily.
Purchasing New Parts
Purchasing the right replacement parts is crucial for the success of your bathtub faucet replacement project.
Identify Your Faucet Type:
Before purchasing new parts, determine the type and model of your existing bathtub faucet. Look for any identifying markings or labels on the faucet itself, or consult the manufacturer's documentation if available. This information will help you ensure compatibility when selecting replacement parts.
Make a List of Needed Parts:
Based on your assessment of the old faucet and any issues it may have, make a list of the replacement parts you'll need. Common replacement parts for bathtub faucets include stems, handles, spouts, cartridges, and trim kits. Note down any specific measurements or specifications required for each part.
Visit a Hardware Store or Plumbing Supply Retailer:
Head to your local hardware store or plumbing supply retailer to purchase the replacement parts. Bring along any documentation or measurements you've taken to ensure you get the right parts. If you're unsure about which parts to buy, don't hesitate to ask for assistance from a knowledgeable staff member.
Check Compatibility:
When selecting replacement parts, make sure they are compatible with your existing faucet and plumbing setup. Pay attention to factors such as the brand, model, size, and configuration of the parts to ensure a proper fit. It's also a good idea to verify that the replacement parts match the style and finish of your existing bathroom fixtures for a cohesive look.
Consider Quality and Durability:
Invest in high-quality replacement parts that are built to last. Look for reputable brands known for their reliability and durability. While quality parts may come with a higher price tag, they'll ultimately save you time and money in the long run by reducing the need for frequent repairs or replacements.
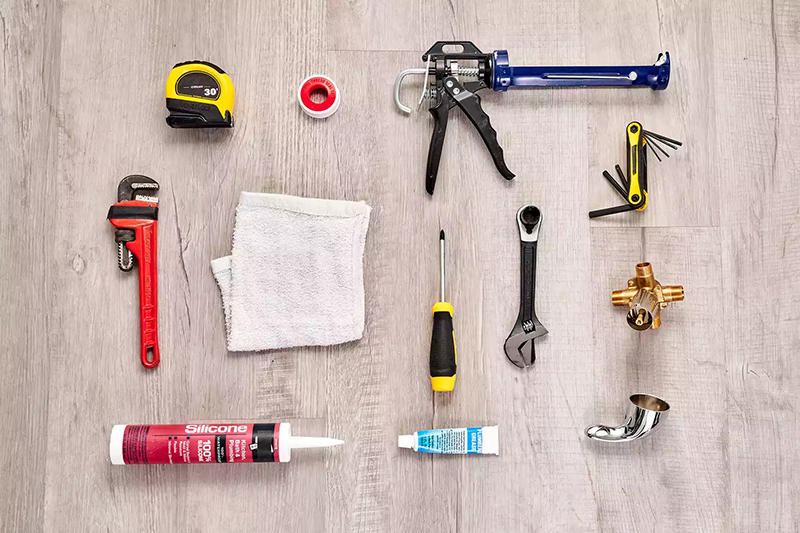
Purchase Necessary Tools and Supplies: In addition to replacement parts, don't forget to pick up any tools or supplies you'll need for the installation process. This may include wrenches, screwdrivers, plumber's tape, silicone sealant, and pipe thread compound.
Review Return and Warranty Policies:
Before making your purchase, review the store's return and warranty policies. Ensure that you have the option to return or exchange any parts that are not compatible or defective. Keep your receipts and documentation in case you need to make a warranty claim in the future.
By following these steps, you can confidently purchase the right replacement parts for your bathtub faucet replacement project, ensuring a smooth and successful installation process.
Installing the New Stem
Installing the new stem is a critical step in replacing your bathtub faucet and ensuring proper functionality.
Gather Necessary Tools and Materials:
New stem
Plumber's tape
Adjustable wrench
Screwdriver
Prepare the Workspace:
Clear the area around the bathtub and ensure adequate lighting.Lay down a towel or drop cloth to protect the surface from scratches or damage.
Wrap Threads with Plumber's Tape:
Before installing the new stem, wrap the threads of the stem with plumber's tape. This helps create a watertight seal and prevents leaks.
Insert the New Stem:
Carefully insert the new stem into the faucet body, ensuring that it aligns correctly with the opening.
Use gentle pressure to push the stem into place, taking care not to force it.
Tighten the Retaining Nut:
Once the stem is in position, use an adjustable wrench to tighten the retaining nut securely.Turn the wrench clockwise to tighten the nut, ensuring a snug fit.
Attach the Handle:
If the new stem does not come with a handle attached, slide the handle onto the stem.Secure the handle in place by tightening the handle screw with a screwdriver.
Test the Operation:
Turn on the water supply to the bathtub and test the operation of the new stem.Check for any leaks around the stem or handle and tighten connections if necessary.
Make Adjustments:
If the water flow or temperature is not satisfactory, you may need to make adjustments to the stem or handle.Refer to the manufacturer's instructions for guidance on making adjustments.
Clean Up:
Once you're satisfied with the installation, clean up any debris or residue from the work area.Dispose of any old parts or packaging materials properly.
Installing the New Handles
Installing the new handles is an essential step in replacing your bathtub faucet and ensuring proper functionality and aesthetics.
Gather Necessary Tools and Materials:
New handles
Screwdriver
Set screw (if required)
Handle screws (if not included with the handles)
Plumber's tape (optional)
Prepare the Workspace:
Clear the area around the bathtub and ensure adequate lighting.
Lay down a towel or drop cloth to protect the surface from scratches or damage.
Position the Handles:
Place the new handles onto the stems of the faucet, aligning them properly with the grooves or splines on the stem.
Attach the Handles:
If the handles have set screws, locate the set screw hole on each handle and insert the set screw using a screwdriver. Tighten the set screws securely to hold the handles in place.If the handles do not have set screws, use handle screws to attach them to the stems. Insert the handle screws into the holes on the handles and tighten them securely using a screwdriver.
Test the Operation:
Once the handles are attached, test the operation of the faucet by turning the handles to open and close the water flow.Check for smooth movement and proper alignment of the handles.
Make Adjustments:
If the handles feel loose or wobbly, tighten the set screws or handle screws as needed to secure them more firmly.If the handles do not operate smoothly, check for any obstructions or misalignments and make adjustments as necessary.
Apply Plumber's Tape (if needed):
If there are any gaps between the handles and the stems, or if you notice any leaks around the handles, you can apply plumber's tape to create a better seal.Wrap a few layers of plumber's tape around the threads of the stems before attaching the handles to provide a tighter seal and prevent leaks.
Clean Up:
Once the handles are installed and properly adjusted, clean up any debris or residue from the work area.
Installing bath taps Spout
Prepare the Workspace:
Clear the area around the bathtub and ensure there is enough space to work comfortably.
Lay down a towel or drop cloth to protect the bathtub surface from scratches or damage.
Remove Old Spout (if applicable):
If there is an existing spout, unscrew it counterclockwise or use a pipe wrench to loosen and remove it from the pipe extending from the wall.Clean the threads on the pipe to ensure a smooth surface for the new spout.
Apply Plumber's Tape:
Wrap a few layers of plumber's tape clockwise around the threads of the pipe extending from the wall. This will create a tight seal and prevent leaks.
Position the New Spout:
Slide the new bathtub spout onto the pipe extending from the wall, ensuring that it aligns properly with the opening.If the spout has a set screw, tighten it securely using a screwdriver to hold the spout in place. If not, ensure the spout fits snugly onto the pipe.
Secure the Spout:
Use an adjustable wrench to tighten the spout onto the pipe, turning it clockwise until it is firmly in place. Be careful not to over-tighten, as this could damage the spout or the pipe.
Test for Leaks:
Turn on the water supply to the bathtub and check for any leaks around the base of the new spout.
If you notice any leaks, tighten the spout further or reapply plumber's tape as needed to create a better seal.
Check Functionality:
Test the operation of the new spout by turning on the water flow and ensuring it diverts water properly into the bathtub.Check for smooth movement and proper alignment of the spout.
Clean Up:
Once the new spout is installed and tested, clean up any debris or residue from the work area.
Dispose of any old parts or packaging materials properly.
Testing and Final Inspection
After completing the installation of your new bathtub faucet and spout, it's essential to conduct thorough testing and a final inspection to ensure everything is working correctly.
Turn On the Water Supply:
Open the main water shut-off valve to restore water flow to the bathtub faucet.
Check for Leaks:
Carefully inspect the area around the faucet, handles, and spout for any signs of leakage.Look for water drips, puddles, or moisture accumulation, especially around connection points and joints.If you notice any leaks, tighten connections or apply additional plumber's tape as necessary to create a watertight seal.
Test Water Flow and Temperature:
Turn on the bathtub faucet and test the water flow to ensure it is smooth and consistent.
Adjust the hot and cold water handles to verify that they regulate the water temperature effectively.
Run the water for a few minutes to flush out any air bubbles or debris from the plumbing system.
Test the Bathtub Spout:
Activate the diverter (if applicable) to divert water flow from the faucet to the bathtub spout.
Ensure that the spout delivers water into the bathtub without any leaks or splashing.
Operate the Handles:
Test the operation of the handles by turning them on and off multiple times.
Verify that the handles move smoothly and without any resistance.
Check for Proper Drainage:
Plug the bathtub drain and fill the tub with water to check for proper drainage.
Remove the drain plug and observe how quickly the water drains from the bathtub.
Inspect for Aesthetic and Structural Issues:
Conduct a visual inspection of the entire bathtub faucet assembly, including the handles, spout, and trim.Ensure that all components are securely attached and properly aligned.Look for any aesthetic imperfections or structural issues that may need to be addressed.
Make Necessary Adjustments:
If you identify any issues during testing or inspection, make the necessary adjustments to resolve them.Tighten loose connections, adjust handles or spouts, and address any leaks promptly.
Clean Up:
Once testing and inspection are complete, clean up any debris or residue from the work area.
In conclusion, replacing a bathtub faucet and spout is a manageable project that can be accomplished with the right tools, materials, and knowledge. By following the step-by-step guide provided in this article, you can successfully remove the old faucet, purchase the necessary replacement parts, and install the new faucet and spout.
Throughout the process, it's essential to prioritize safety, attention to detail, and quality workmanship. Take the time to carefully inspect your plumbing fixtures, identify any issues, and select high-quality replacement parts that are compatible with your existing setup.
Testing and final inspection are crucial steps to ensure that your new bathtub faucet and spout are installed correctly and functioning as intended. By checking for leaks, testing water flow and temperature, and inspecting for aesthetic and structural issues, you can address any issues promptly and prevent potential problems down the line.
Ultimately, a successful bathtub faucet replacement project can improve the functionality and appearance of your bathroom while providing peace of mind knowing that your plumbing fixtures are in good working order. If you encounter any challenges during the installation process or are unsure about any aspect of the project, don't hesitate to seek assistance from a professional plumber. With proper planning and execution, you can enjoy the benefits of a refreshed bathtub faucet and spout for years to come.
")
")
")

")
")

")

")
")

